Hi folks!
I got myself a second UHKv1 and decided to replace the switches. I’m no stranger to soldering, but I definitely wouldn’t say that I’m a pro either.
I started with one half and got a success rate of about 80%. I managed to fix a few of the faulty switches by removing them and soldering them again. But for 6 of them, I simply just can’t get them to work. Some of them seem to suffer from the “Insufficient Wetting (Pad)” problem as described in this Adafruit guide, and I ried cleaning them and solder according to the guide, without much luck.
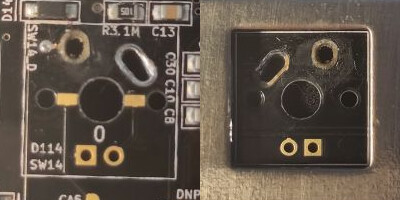
Here’s a photo of the PCB for one of the problematic keys, from both sides:

Can somebody:
- Tell me how I ruined it (and hopefully also how to fix it again)?
- Draw on top of the photo and tell me exactly where the conducting part of the holes are, so I can make sure to focus my soldering effort?
Any help is greatly appreciated!